Introduction
Installing .NET on a Windows Server 2019 is an essential step for developers and web application hosting services. .NET provides a wide range of features and seamless integration with other Microsoft products. However, for individuals coming from a non-Windows background, the process of installing and configuring IIS (Internet Information Services) on a Windows Server can be a bit challenging. In this tutorial, we will provide you with an easy-to-follow guide on how to install .NET on Windows Server 2019, ensuring a smooth setup process.
Install .NET on Windows Server 2019
Step 1: Download SXS zip file from the Given link. To begin the installation process, you will need to download the SXS zip file from the provided link. This file contains the necessary components for installing .NET on Windows Server 2019. Save the file to a convenient location on your server.
Step 2: Extract SXS zip and copy the full path of the SXS folder as shown in the image. Once the SXS zip file is downloaded, extract its contents to a folder on your server. Next, navigate to the extracted folder and copy the full path of the SXS folder. You will need this path later during the installation process.

Step 3: Open the Server Manager on your Windows Server 2019 machine. Launch the Server Manager application on your Windows Server 2019 machine. You can typically find it in the Start menu or by searching for “Server Manager.”

Step 4: Click on “Add Roles and Features.” Within the Server Manager window, locate and click on the “Add Roles and Features” option. This will initiate the installation wizard.

Step 5: On the “Before you begin” page, click the “Next” button. The installation wizard will display a “Before you begin” page. Review the information provided and click the “Next” button to proceed with the installation.

Step 6: In the “Select installation type” section, select the “Role-based or feature-based installation” option and click “Next”. On the “Select installation type” page, choose the “Role-based or feature-based installation” option. This allows you to install specific roles and features required for your server. Click “Next” to continue.

Step 7: On the “Select destination server” page, select the server where you want to install .NET and click “Next”. Select the server where you want to install .NET Framework 3.5. You can choose a local server or a remote server from the available options. Click “Next” to proceed.

Step 8: On the “Select server roles” page, select the “.NET Framework 3.5 Features” role and click “Next”. In the “Select server roles” section, locate and select the “.NET Framework 3.5 Features” role. This will automatically include the necessary components for .NET installation. Click “Next” to proceed.

Step 9: In the “Features” section, select the “.NET Framework 3.5 (includes .NET 2.0 and 3.0)” option and click “Next”. In the “Features” section, you will see a list of available features. Locate the “.NET Framework 3.5 (includes .NET 2.0 and 3.0)” option and select it. This ensures that both .NET 2.0 and 3.0 frameworks are installed on your server. Click “Next” to continue.

Step 10: Review the selections on the “Confirm installation selections” page and click “Specify an alternate source path”. On the “Confirm installation selections” page, review the chosen features and roles. Click on the “Specify an alternate source path” link to provide the path to the SXS folder that you copied in Step 2.
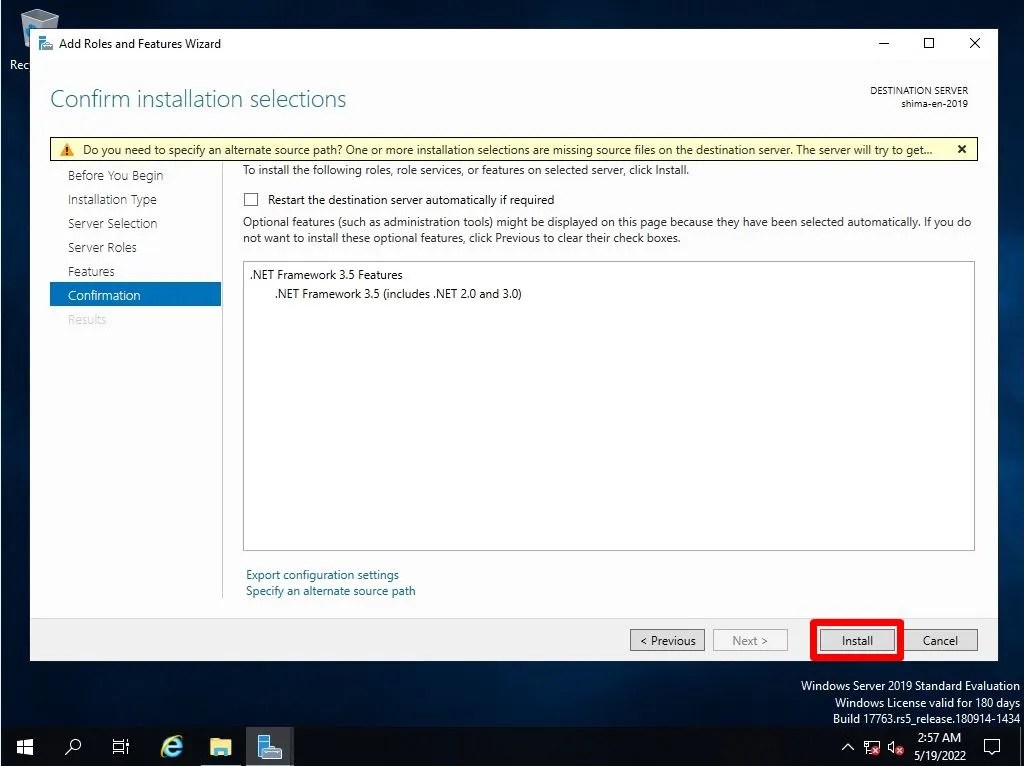
Step 11: Paste the SXS folder path that you previously copied and click “OK,” then click on “Install”. In the “Specify an alternate source path” dialog box, paste the path to the SXS folder that you copied earlier. Click “OK” to proceed. Finally, click the “Install” button to begin the installation process.

Step 12: Wait for the installation to complete and then click “Close”. Allow the installation process to run, and wait until it completes. Once the installation is finished, you will see a notification indicating the successful installation. Click “Close” to exit the installation wizard.

Conclusion
In this tutorial, we have provided a step-by-step guide on how to install .NET on Windows Server 2019. By following these instructions, you can seamlessly integrate .NET into your server environment. We hope this guide has cleared any confusion and assisted you in configuring IIS on your Windows Server. Stay tuned for more informative tutorials!
If you are in need of a high-performance VPS or dedicated server with powerful processors and robust security, we are currently offering an amazing discount on all our servers. Take advantage of this offer and enhance your hosting capabilities with our reliable services.